


Contacts:
+38 (063) 720 46 07
bburo.info@gmail.com
Our address:
Kyiv, Popudrenko Street, 1A, The Space Coworking
Kyiv, Kyrylivska Street, 15a / 1, TCEH Podol

Submit request to calculate renovation cost for free
-
-
To submit the request just fill in your details below and we will contact you in the nearest time
-
-
How we did a contemporary renovation of a rental apartment and how much it cost
A "withered" one-bed turned into a stylish and comfy dwelling. We used light-grey paint, floor-to-ceiling wardrobes and JYSK furniture.

Меню
Project case study
How we did a contemporary renovation of a rental apartment and how much it cost
A "withered" one-bed turned into a stylish and comfy dwelling. We used light-grey paint, floor-to-ceiling wardrobes and JYSK furniture.


Особистий кабінет
Kyiv city, Saperno-Slobidska Street
59
2
Location :
Area m2 :
Number of rooms :
Scandinavian + Contemporary
Secondary
4
Style :
Real estate market :
Execution period (months) :
This article will be interesting for those seeking to do a stylish and durable renovation without overpaying. We have collected descriptions all stages, life-hacks, and useful information and in the end we'll show how much everything cost and share a convenient digital tool for renovation control.

When tenants of several years moved out from the apartment, landlord decided to renovate it to raise rental charges and maximise her passive income.
Since the customer is an active businesswoman who spends most of her time outside Kyiv, dealing with renovation personally and playing the part of the "fore-master" was quite inappropriate. What was needed was a team which could take on full implementation without raising the cost in the process of work. Having agreed our estimates after a short negotiation we proceeded to business.
Maksim Kolot
Buildburo's Chief account manager
See some photos of the apartment's initial condition and now we shall walk through every stage of renovation.
Stage 0. Project development
Apartment layout was left untouched except for a few small changes: we moved bathroom entrance to allow for installation of the washbasin, and narrowed down doorframe in the sitting room to fit in a built-in wardrobe.
The design is centered around a simple concept: a combination of Scandinavian and Contemporary styles: light colors, natural materials, sufficient storage space. The key task was to achieve the most stylish outlook on a tight budget.
As a rule, only a set of working drawings is implied at this stage, however in this particular project the Customer controlled renovation remotely, so to ease communication and outline perspective we also added visualisations.
As a rule, only a set of working drawings is implied at this stage, however in this particular project the Customer controlled renovation remotely, so to ease communication and outline perspective we also added visualisations.
As for the drawings, we prepared a minimum required set of drawings without detailing technical aspects. Of course, such approach creates risk of "screw-ups" in the process of work, but in our case the drawings had to be done in the shortest time possible, so for this project we assembled a team of highly trained seasoned masters to make sure nothing would go wrong.
Here are some of the drawings:
Here are some of the drawings:
Some of our clients come with ready-made design projects. Quite often these lack detailing of technical aspects, so we have to refine and complete them. Therefore, if you develop your design with one company but renovate with another, be sure to ask for explicit detailing of technical design in the drawings (wiring plans, water supply plan, tiling etc.).
Ivan Panasyuk
Buildburo's Chief project manager
Stage 1. Demolition works
Renovation must be awesome both on the outside and in. While it is possible to optimize finish work budget, it isn't a good idea to try to save up on concealed works. Apartment layout was left untouched except for a few small changes: we moved bathroom entrance to allow for installation of the washbasin, and narrowed down doorframe in the sitting room to fit in a built-in wardrobe.
Concealed works are a type of work you cannot see or inspect once renovation is completed (wall construction, plastering, electrical wiring and plumbing etc.).
The best solution concerning old plastering was to remove it completely with hammer drill and apply new gypsum machine plaster. It was a costly but a necessary step.
That is what apartment looked like after demolition works and waste removal:
That is what apartment looked like after demolition works and waste removal:
"Please warn your neighbours about upcoming noisy works such as demolition. To avoid any arguments, you can either put up notifications across the floor or tell the concierge."

- on the experience of Kirill, Buildburo's Chief taskmaster
Stage 2. Plastering
This process isn't as hard as it is nuanced: delivering and lifting several tons of material and heavy equipment, plugging in a plastering station to 380V, technology compliance in the process of work and so on. Renovation must be awesome both on the outside and in. While it is possible to optimize finish work budget, it isn't a good idea to try to save up on concealed works.
What you should pay attention to when accepting plastering works:

Wall joints
They are hard to reach, which is why some plasterers do not take proper care of them. Pay close attention to wall and ceiling joints as well as windowsill joint. Check the quality of jambs – there should be no chinks between the window and the jambs.

Steel and metal
Before plaster is applied, all metal should be covered with primer, otherwise rust will later appear on the walls. When plastering is completed, beacons should be removed to avoid the same effect.

Corners
Make sure that corners where furniture is to be installed are 90º.

Planes
Vertical or horizontal deflections per 1 m should account for no more than 2-3 mm. Maximum vertical deflection full height should not exceed 10 mm. If present uneven surfaces should be no deeper than 3 mm.

Waste
Waste should be disposed of. Plastering works produce a lot of it and it will handicap the works to follow.
This is what a fresh wet coat of plaster looks like. Apparently this site had quite curved brick walls. Unlike a regular layer of beacon plaster which is about 2-3 cm, this one required up to 9 cm. Which is why, it took walls almost two weeks to dry up, let alone during the warmer time of the year. Therefore, the best solution concerning old plastering was to remove it completely with hammer drill and apply new gypsum machine plaster. It was a costly but a necessary step.
This is what apartment looked like after plastering:
This is what apartment looked like after plastering:
"Let plaster dry before proceeding to finish works. And don't forget to lay out air conditioning pipeline, so you won't have to cut any more chases."
- on the experience of Kirill, Buildburo's Chief taskmaster
STAGE 3. Rough-in electrical wiring and plumbing
"Rough-in" means concealed, what we won't be able to see once renovation is completed. Plumbing pipework installation, fittings, cable-laying, junction box installation etc.
Make sure to use the best materials and components for this stage. It's better to pay once than to later have to remove it all over again and pay over.
Make sure to use the best materials and components for this stage. It's better to pay once than to later have to remove it all over again and pay over.
Important: every type of work should be done by an experienced tradesman. Electrician for electrical wiring, plumber for plumbing, tile-layer for tiling etc. Be sure to clear up this matter when hiring a team. Composite teams where anyone can cover for anyone else should raise suspicion.
You should also ensure that electrical socket placement and pipeline connections match the drawings. Tradesman may sometimes make mistakes which are easy to mend at this stage.
This is what apartment looked like after rough-in electrical wiring and plumbing:
This is what apartment looked like after rough-in electrical wiring and plumbing:
"It would be useful to check pressure in the pipework as well as sockets and lighting fixtures."
- on the experience of Kirill, Buildburo's Chief taskmaster
STAGE 4. Finishing works
This stage defines apartment's final look. All works at this point require extra care on the side of the masters as well as technical supervisor. Attention to detail is key to this part.
No Customer would want to supervise workers' "screw ups", which is why all finish works have to be performed by dedicated professionals. There seem to be many house painters or tile-layers but really experienced ones are rare and their services do not come cheaply.
No Customer would want to supervise workers' "screw ups", which is why all finish works have to be performed by dedicated professionals. There seem to be many house painters or tile-layers but really experienced ones are rare and their services do not come cheaply.
One of recap videos of renovation process for the Customer
Since our budget was tight, we chose to save up on finish. But it is also important not to go over the top with economy, or else the apartment will look cheap and unsustainable. Here is a list of good value materials and components:
Які матеріали використовувалися?
Floors
All rooms are laminated with German Classen, durability class 32/АС4.
Sealer was also applied to grout lines in the kitchen.
«athroom was fitted with Spanish porcelain tiles PAMESA.
Sealer was also applied to grout lines in the kitchen.
«athroom was fitted with Spanish porcelain tiles PAMESA.
Walls
Non-woven washable wall-paper and paints Kolorit Legenda. Bathroom walls are covered with the same porcelain tiles as the floors but also wood grain porcelain tiles Zeus Ceramica.
Ceilings
Stretching white matte ceilings with a niche for cornice. This is a quick, good looking, and cost effective solution in comparison with others.
Finish wiring
Sockets and switches Schneider Electric, downlight lamps from Epicenter.
Finish plumbing
WC and washbasins Cersanit, bathtub Kolo, faucets and shower set Primera.
List of materials with full names and pictures
Go to list →
Stage 5 (final)
finish works
finish works
We purchased most of the furniture at JYSK on sales. We ordered bed Signal from Poland. Sofa Blest was acquired in the sales. Additionally, we got matrass Askona.
As for the kitchen and built-in cabinets, these were tailor made. To choose producer we ran a tender with the criteria of "Price" and "Delivery time".
It is best to purchase kitchen appliances at the same place as the kitchen. This way it's much cheaper.
We started looking for appropriate furniture in the midst of renovation process as this task is really time-consuming. Generally, if you have an approved design project, you may start checking furniture shops right away. Time to chase some sales especially because they are quite frequent in this industry and may save you up to 30% of your furniture budget.
We started looking for appropriate furniture in the midst of renovation process as this task is really time-consuming. Generally, if you have an approved design project, you may start checking furniture shops right away. Time to chase some sales especially because they are quite frequent in this industry and may save you up to 30% of your furniture budget.
"You may consider hiring a kitchen specialist once plaster works are over. This way you won't have to wait another month after renovation of your flat is completed"
- on the experience of Kirill, Buildburo's Chief taskmaster
The result
The last week of renovation was the hardest. New tenants were keen to move while we still had to furnish the flat. Final touch-ups, assembling the kitchen and some furniture, cleaning, managing little emergencies. All in all, it was hard. But we made it. We met the deadline and we didn't exceed the budget.
This is what we had in the end:
This is what we had in the end:
How much did it cost?
As promised here is the structure of all expenses. The prices are indicated as of the end of 2019 so they may now differ. To calculate the cost of renovation for your apartment use our Calculator.
Renovation:
Furniture, appliances etc:
Digital tools to control
renovation
renovation
We have described this aspect in-detail on our Instagram account, so here is a short list of handy tools we use during the projects.

Customer's profile
We have recently introduced this function and are already receiving positive feedback from our clients.
Drawings, weekly reports, progress status, financing details, and project manager's contacts are added and updated on a regular basis.
Drawings, weekly reports, progress status, financing details, and project manager's contacts are added and updated on a regular basis.
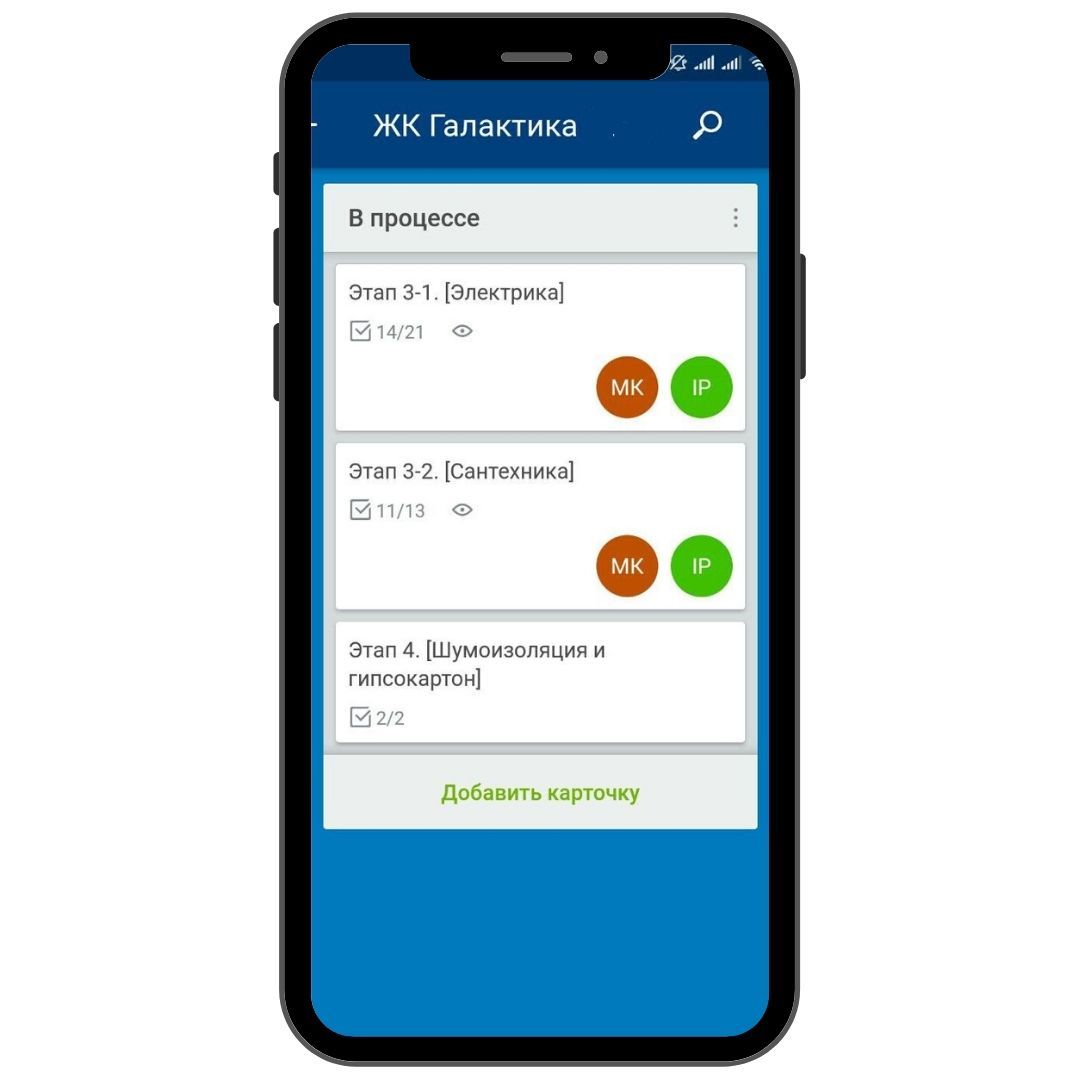
Trello
We monitor every task from here. Lists, checklists, notes and references.

Telegram
The key app is surelyTelegram.
We start a new group-chat for every new project to deal with on-going tasks, keep records, coordinate activities of each member of the team.
We start a new group-chat for every new project to deal with on-going tasks, keep records, coordinate activities of each member of the team.
We have shared our experience of performing renovation in this apartment from cover to cover and hope you found it useful. Follow us on Instagram where we continue to post relevant information on-topic.
So long!
So long!
Do you know how much your flat renovation will cost you?
You give us your contacts and we give you a detailed estimate. In 3 days.

Free calculation of the cost of repair
-
-
To leave a request, just leave your contacts below and we will contact you shortly
-
-
Read also:
Renovation in practice. One-room apartment in Galaktika Residential Complex
A detailed review of all stages, practical solutions, and common mistakes no one ever talks about.
Renovation as seen by the customer. one-bedroom apartment in Galaktika Residential Complex
What renovation looks like as seen by the customer. An interaction scheme, control mechanisms, and the cost.
Kyiv city, Victory V Residential Complex, Pobedy Avenue, 5В
The task for this site was to develop and perform renovation in 3,5 months. Which is why we decided to launch both processes simultaneously and acted according to the following strategy: immediately started doing the set of drawings and plastering works.

EN
Our address
Kyiv, Popudrenko Street, 1A, The Space Coworking


Kyiv, Kyrylivska Street, 15a / 1, TCEH Podol
Contacts for suppliers
If you are a supplier, please contact only the contact details above
Contacts for clients
© bburo.org 2021. Any use or copying of materials or collection of site materials, design elements and design is allowed only with the permission of the copyright holder and only with reference to the source : https://bburo.org
Work days
Mn - St :
10 am - 7 pm
Sunday:
Closed
ВС: