


Contacts:
+38 (063) 720 46 07
bburo.info@gmail.com
Our address:
Kyiv, Popudrenko Street, 1A, The Space Coworking
Kyiv, Kyrylivska Street, 15a / 1, TCEH Podol

Submit request to calculate renovation cost for free
-
-
To submit the request just fill in your details below and we will contact you in the nearest time
-
-
Renovation in practice.
One-room Apartment in Galaktika Residential complex
A detailed review of all stages, practical solutions and common mistakes no one ever talks about.

Project case
Renovation in practice.
One-room Apartment in Galaktika Residential complex
One-room Apartment in Galaktika Residential complex
A detailed review of all stages, practical solutions and common mistakes no one ever talks about.
Menu


Personal profile
Kyiv city, Yevhena Sverstyuka Street, 6, Galaktika Residential Complex
47
2
Location :
Area m2 :
Number of rooms :
Contemporary
New-build
3,5
Style :
Real estate market :
Execution period (months) :
In this article we are going to tell you how we renovated a newly built European one-bed apartment in 3.5 months. It is not about design but rather technical and organizational aspects. We will even share some workers' "screw-ups" and how much it all cost.

Our Customer Andrey came to us with a ready-made design project. So we followed a tried-out scheme: analyzed the drawings, calculated the scope of work, accounted a detailed estimate. We had our price quote ready in two days. Negotiation process took 10 more followed by signing the contract and works began.
Initial project design lacked specification of materials and components. So we had to select them independently and then approve them with the Customer. We previously included their cost in the estimate so that the Customer would clearly see full cost of renovation.
Maksim Kolot
Buildburo's Chief account manager
See some photos of the apartment's initial condition and now we shall walk through every stage of renovation.
Stage 0. Preparation works
Before breaking walls it's worth preparing and thoroughly organizing the plan of works to minimize the probability of unexpected situations or mistakes.
Even before we signed the contract we already had a milestone schedule with a breakdown into stages:
Even before we signed the contract we already had a milestone schedule with a breakdown into stages:
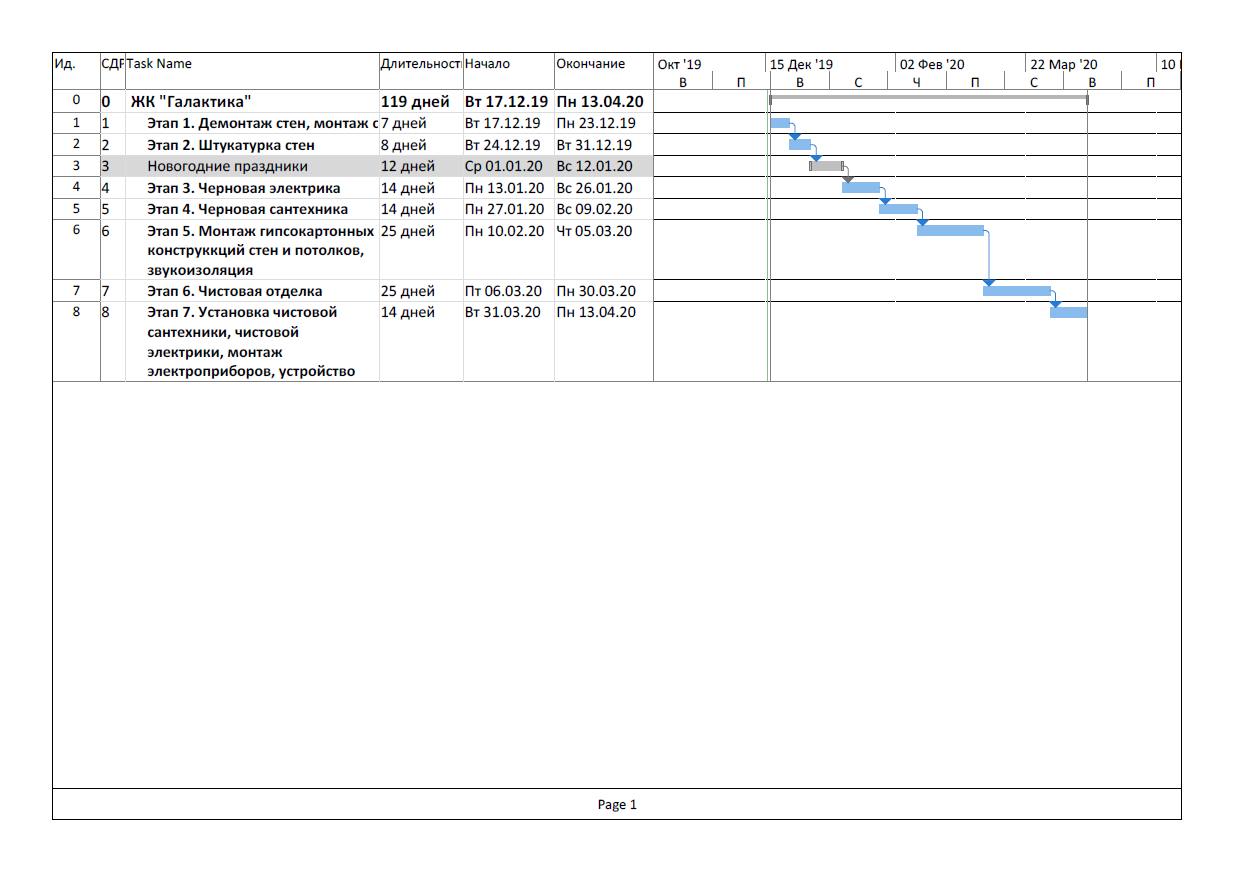
A financing schedule is developed in relation to work stages to inform the Customer of when and how much funding is required for renovation.
This stage also includes basic procurement with materials: construction film, waste bags, everything required for clean-up, a WC for workers is installed, the place is equipped with supplies and materials for stage 1.
This stage also includes basic procurement with materials: construction film, waste bags, everything required for clean-up, a WC for workers is installed, the place is equipped with supplies and materials for stage 1.
Stage 1. Wall Demolition. Wall installation
The initial layout of the apartment was far from perfect since there wasn't enough room left for the kitchen and bedroom.
The design project involved a slight remodeling of the apartment to turn it into a European one-bed which proved to be a more comfortable solution.
In addition, the bathroom was enlarged at the expense of the corridor which let us fit a boiler and a washing machine in separate niches.
The design project involved a slight remodeling of the apartment to turn it into a European one-bed which proved to be a more comfortable solution.
In addition, the bathroom was enlarged at the expense of the corridor which let us fit a boiler and a washing machine in separate niches.
A European two-bed
A European two-bed includes one separate bedroom and a walk-through sitting room joined with the kitchen.
Partition walls were originally made of slag stone however we built ones of aerated concrete.
This is what the apartment looked like at this stage:
This is what the apartment looked like at this stage:
"It is better to check masonry layout right away than to later have to break and redo the walls."

- on the experience of Kirill, Buildburo's Chief taskmaster
Stage 2. Plastering
We started the project on December 17, 2019 and our primary goal was to manage demolition and installation of partition walls as well as plaster works before New Year. This way the plaster would have dried up throughout holidays and we would avoid delays in work. Construction and plastering were carried out promptly and by December 30 machine made beacon plaster was fully applied. The heat from the radiator was sufficient for drying especially because the winter that year turned out comparatively warm.
To use an electric plaster machine which requires 380V one should get permission from the Local Public Utilities Office and pay receipt of 1300 hrn. This is a so called compensation for emergency service request. Additionally, property owner will restrict the time for noisy works and will require the builders to acquire a work pass.
Ivan Panasyuk
Buildburo's Chief project manager
This is what the flat looked like at the end of stage 2:
What mistakes are usually made at this stage?

Hurry
Always follow technological order of works and don't forget to make sure the plaster has dried up before proceeding. If the plaster is still wet, it would be impossible to properly apply finish. This can also cause mould to grow on the walls.

Unreasonable economy
Avoid buying plaster of dubious quality. You might save a penny on the buy, but you risk overrunning your budget trying to get things right eventually.

Economy on sustainability
And one more on economy. No bag of cheap plaster will contain information on unpleasant odour remaining after the plaster is applied. Or that you might develop a strong reaction to toxic substances it contains.
European standards are the strictest in their requirements, so it makes sense to order from big reputed brands. We use Knauf MP-75.
European standards are the strictest in their requirements, so it makes sense to order from big reputed brands. We use Knauf MP-75.
Stages 3, 4. Rough-in electrical wiring and plumbing
Although this stage doesn't take much time, it is one of the most essential throughout the course of renovation.
We highly recommend using the best materials and components for these stages. It is better to pay once but make it right than to later have to redo and overpay.
We highly recommend using the best materials and components for these stages. It is better to pay once but make it right than to later have to redo and overpay.
Recommendations for materials:
Water supply pipes – Rehau Rautitan, sewer pipes – Ostendorf, WC frame pack – Geberit, electric cables – VVGng (with matching cut-off for every outlet), cutout – Schneider, electric cabinet – Hager.
Water supply pipes – Rehau Rautitan, sewer pipes – Ostendorf, WC frame pack – Geberit, electric cables – VVGng (with matching cut-off for every outlet), cutout – Schneider, electric cabinet – Hager.
We installed two separate cables from two independent internet providers and secured a backup one as well since continuous connection was Customer's priority. We also installed voltage stabilizer Ukrtechnologia NORMA 5000 (EXСLUSIVE) under electric cabinet.
The apartment is equipped with 61 outlets in total. It may seem too much for a one-bed at first glance, but if we take into account a separately arranged technological and faultless workplace with regular and USB plug sockets, HDMI outlets and Ethernet cables, let alone all other sockets and switches around the flat, it may get clear why so many after all.
A smaller electric cabinet for low voltage is located under the main cabinet to wire in internet cables from the joint corridor.
A smaller electric cabinet for low voltage is located under the main cabinet to wire in internet cables from the joint corridor.
It is prohibited to install air conditioner's drain pipe on the outside at Galaktika Residential Area, so the only solution was to let condensate water drain into the sewer. For this we installed a special s-trap (second photo in the gallery) HL Hutterer & Lechner GmbH (this German and Austrian firm has been in business for over 100 years) and attached the drain pipe.
We also secured washbasin and faucet connection points in the kitchen and bathroom, outlets for a boiler, a washing machine, and a dryer as well as outlets for WC frame pack and hygienic shower.
We also secured washbasin and faucet connection points in the kitchen and bathroom, outlets for a boiler, a washing machine, and a dryer as well as outlets for WC frame pack and hygienic shower.
This is what the apartment looked like after rough-in electrical wiring and plumbing immediately on signing Certificate of Completion and turning the stages over to the Customer:
"Thorough rough-in work consists of high-quality materials and qualified tradesmen. It cannot be cheap."
- on the experience of Kirill, Buildburo's Chief taskmaster
- on the experience of Kirill, Buildburo's Chief taskmaster
Stage 5. Installation of gypsum board walls and ceilings, sound insulation
Have you seen multi-layered systems of sound insulation on Youtube?
All these systems are fine and perform their functions perfectly well, except one small problem. The cost.
Because of the cost customers would often opt for budget-friendly alternatives.
And here it is important not to go too far on economy.
Since this is a topical matter we will share a working version of a simple construction to obtain sound insulation for a reasonable price.
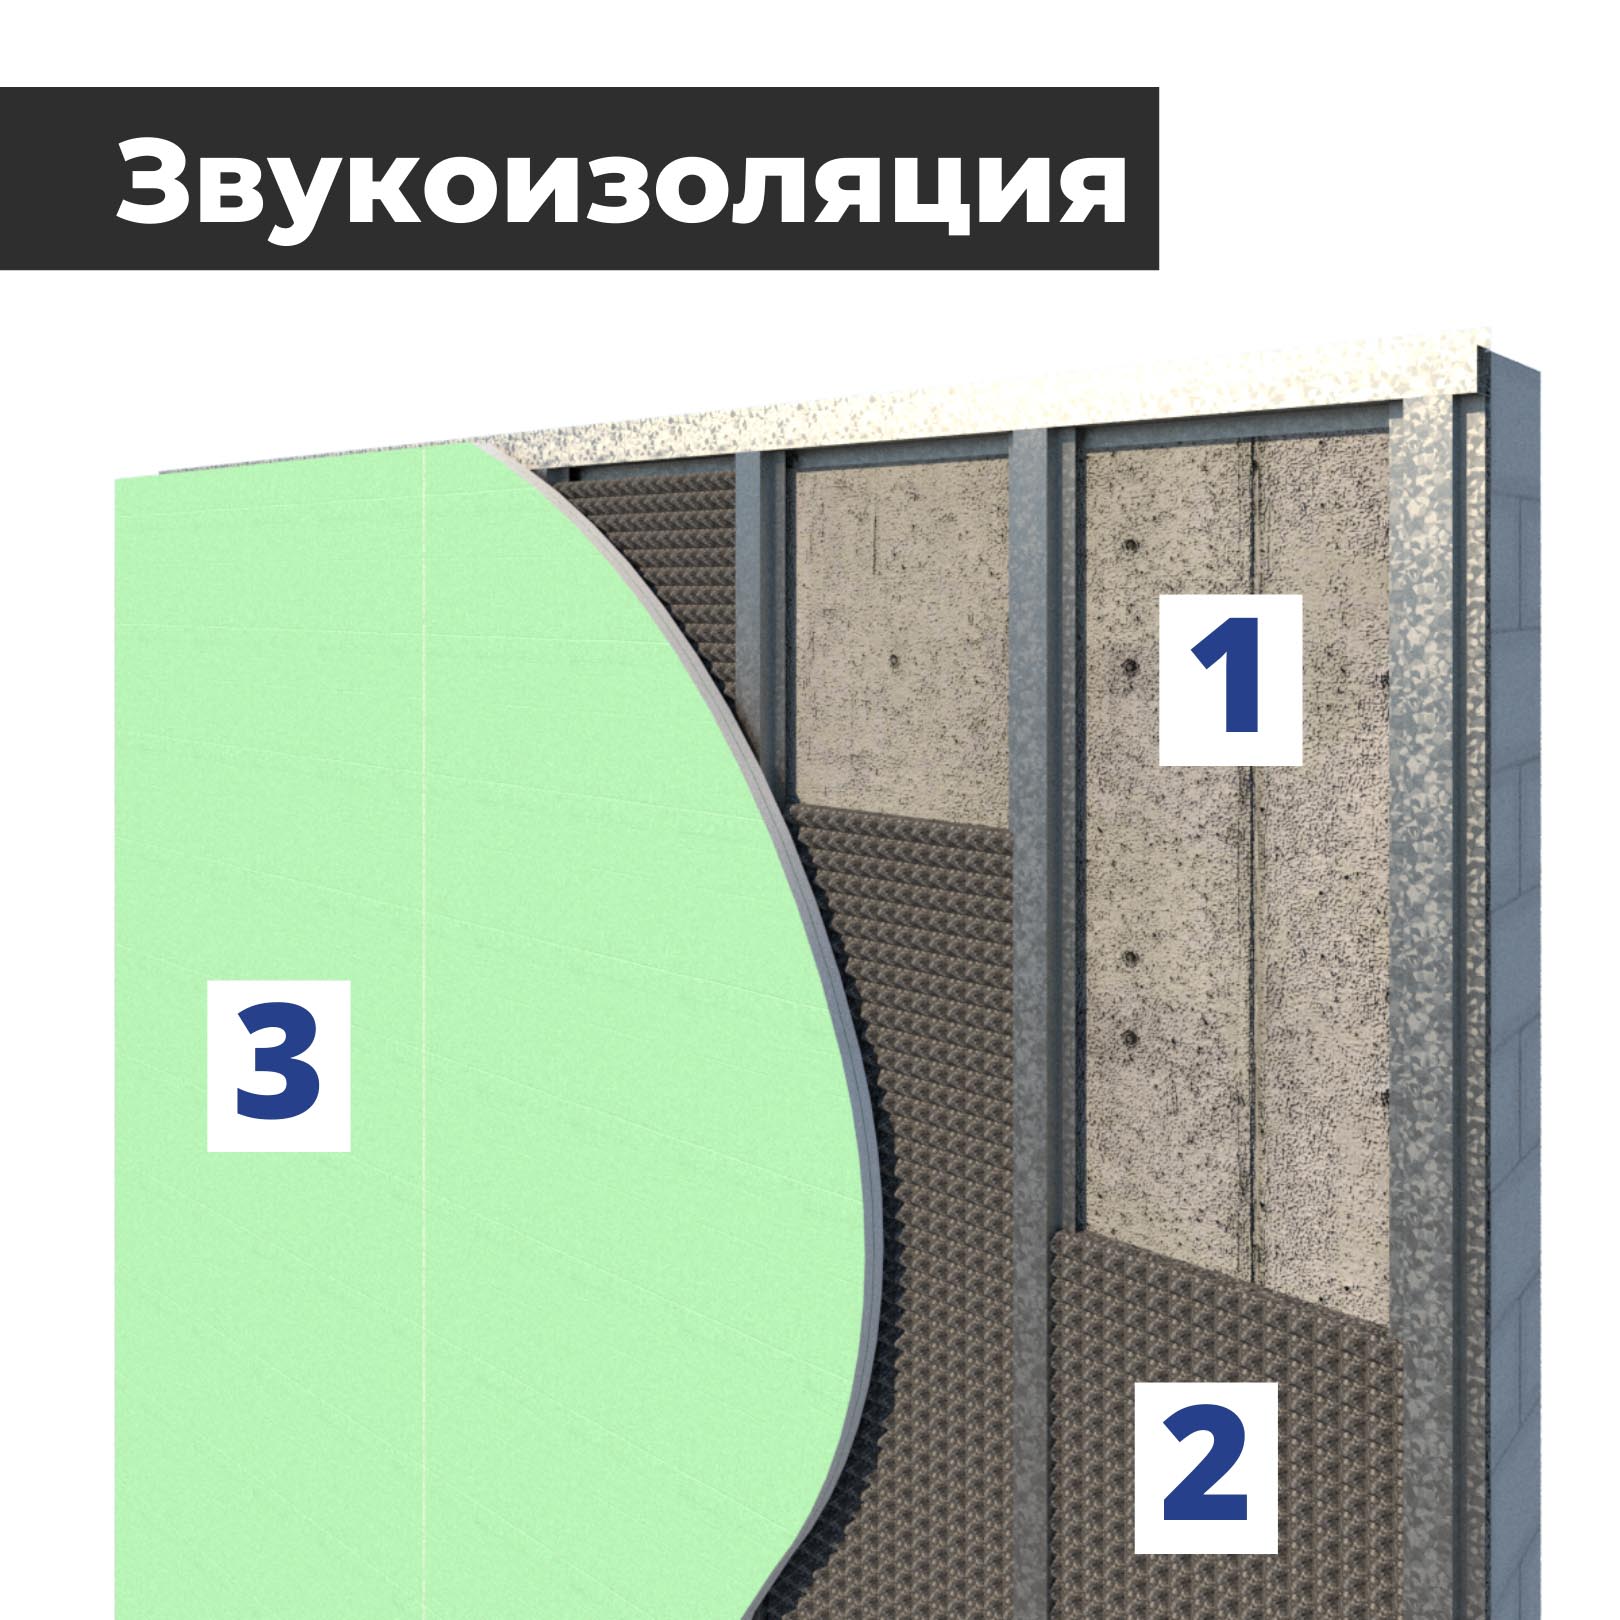
The construction goes as follows (see figure):
1. Wall (concrete, aerated concrete, brick).
2. Acoustic panel ECOSOUND MACSOUND PROF VOLNA.
3. False wall with double-layered gypsum plasterboard.
All these systems are fine and perform their functions perfectly well, except one small problem. The cost.
Because of the cost customers would often opt for budget-friendly alternatives.
And here it is important not to go too far on economy.
Since this is a topical matter we will share a working version of a simple construction to obtain sound insulation for a reasonable price.
The construction goes as follows (see figure):
1. Wall (concrete, aerated concrete, brick).
2. Acoustic panel ECOSOUND MACSOUND PROF VOLNA.
3. False wall with double-layered gypsum plasterboard.
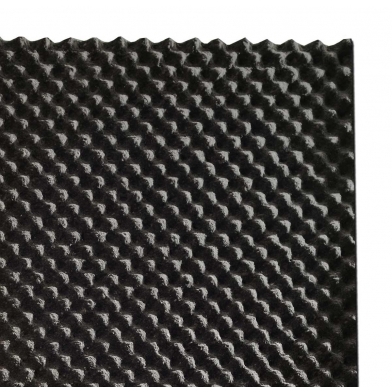
Macsound is a sound absorbing and insulating vibration-isolating material.
This scheme works on the principle of absorption and conservation of mass:
Absorption
Soundwave goes through sound-absorbing material in the wall which transforms it into thermal power. The thicker the panel, the more sound it absorbs.
Mass
Hard material blocks the sound. In this case it is gypsum board. This principle eliminates airborne noise such as music or voice.
The downside of such construction lies in its lower efficiency with impact sounds e.g. footsteps, tapping, heel clicking. Such types of noise require additional dampening with viscoelastic material or hard membranes which belong to the category of multi-layered, complex and expensive systems.
This is what installed sound insulation looks like before applying gypsum board:
We then installed gypsum board constructions: ceilings, sound-insulated walls, WC frame pack and false wall for distribution pipelines in the bathroom, electric heat-insulated flooring in balcony area.
This is what apartment looked like after turning stage 5 over to the Customer. How do you like these marks on the ceiling?
This is what apartment looked like after turning stage 5 over to the Customer. How do you like these marks on the ceiling?
Stage 6. Tile laying
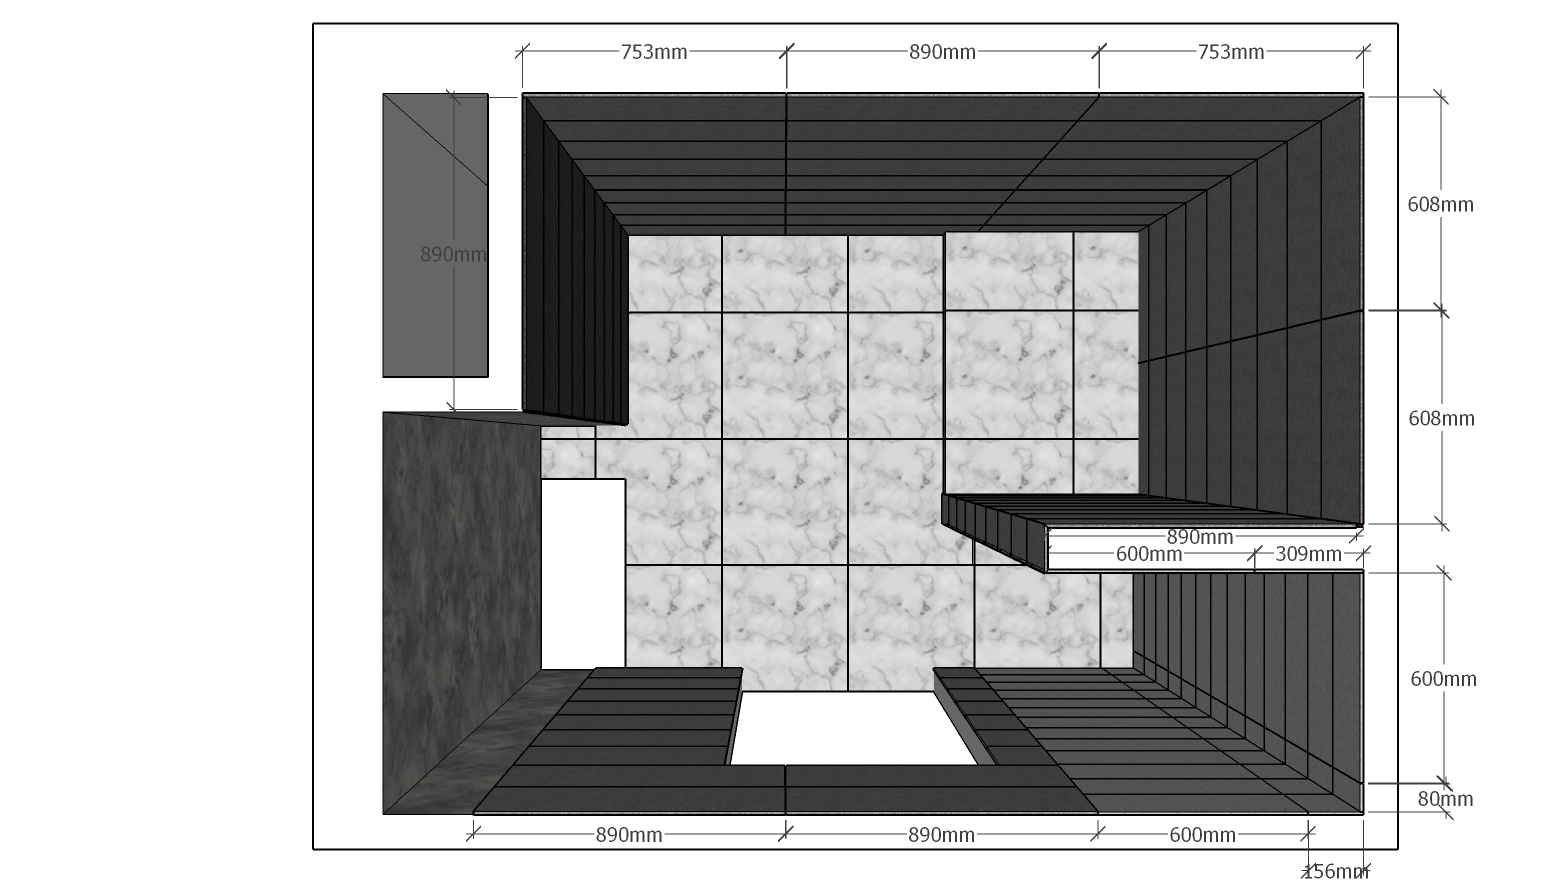
We are moving over to finish work. The success of tile-laying depends on two things: tile layout and tile layer.
Although layout schemes come in all shapes and sizes, only one is correct. Youtube provides a big selection of theme videos, this one one for instance. It is sometimes worth deviating from the rules to save up on tile undercutting. This is what we did when finishing the niche for the dryer and the washing machine knowing that they would be covered by furniture facades. Additionally, we used cheaper tiles as it was a blind area.
Although layout schemes come in all shapes and sizes, only one is correct. Youtube provides a big selection of theme videos, this one one for instance. It is sometimes worth deviating from the rules to save up on tile undercutting. This is what we did when finishing the niche for the dryer and the washing machine knowing that they would be covered by furniture facades. Additionally, we used cheaper tiles as it was a blind area.
Customer's initial project design contained no tile layout scheme. We had to develop it from scratch.
If you are managing renovation by yourself, remember that tile-layer's work is essential as the result will remain in sight for years.
You can cut down on tiles though. You should look out for special offers from Ukrainian producers such as Golden Tile, Zeus Ceramica.
Apart from aesthetics tiling also dictates the quality of work at the following stages. For example, if you order a glass shower enclosure, it will require almost perfectly rectangular walls without irregularities.
A "rip-off" story
Since we take on the entire renovation, it is often our responsibility to organise order and delivery of bathroom components. This time we were ordering a glass shower enclosure which is a tailor-made product. We commissioned a known, and we stress, very well known master. He took measurements, requested two weeks for completion (standard time), and upfront payment of 50%. Long story short: in two weeks he was pitching us tales of his tragic life and delayed his work every day. Eventually, he stopped answering his phone. And of course there was no sign of returning the upfront payment. As the result by the time the flat was turned over, our Customer faced some inconvenience, and we took a hit. We ordered the enclosure from a reputed firm. The Customer did not suffer any extra expenses.
P.S. Three months later the ill-famed master eventually returned the upfront payment.
P.S. Three months later the ill-famed master eventually returned the upfront payment.
A mini life-hack: protect outer corners with the help of wall tiling (they are called 45-degree angle wall tile) as they can be easily damaged when moving and installing heavy components (wastbasin, countertop, WC, washing machine etc.). We try our best to protect all materials and components before renovation is completed.
"A skilled tile-layer is a rarity and his work is never cheap."
- on the experience of Kirill, Buildburo's Chief taskmaster
STAGE 6b. Floor screeds
A short review of construction developer's "screw-ups".
Most new-builds these days are equipped with so called "laser screeds". The word laser comes from levelling laser used to install the screeds. On its own levelling laser is quite a useful technology to apply screeds evenly across the entire apartment. Yet problems arose because of construction masters who had not worked with levelling laser properly. The floor screed happened to have irregularities and uneven levelling in different rooms either because of carelessness or builders' lack of competence.
The necessity to install floor screeds came as a surprise to the Customer for it wasn't previously mentioned in the estimate. But what is more, we noticed the unevenness only after demolishing the walls between kitchen-sitting room and bedroom, which revealed a 1.5 cm irregularity. This fact could not go unnoticed, especially because we were supposed to install quartz vinyl flooring over it and this material requires extreme evenness of the surface.
Lesson: laser screeds may appear perfectly even but at the same time contain irregularities apartment-wide.
STAGES 7, 8. Finishing works, installing finish plumbing and electrical wiring, installing quartz vinyl flooring
These are the most time-consuming and demanding stages. The reason is smooth painted walls and drywall ceilings, which in turn require thorough preparation before painting or else blisters and imperfections will show. It is a complex work requiring time for perfection, although painting itself will take up to 1-2 days.
Full preparation of walls and ceilings for painting took us 4 weeks.
This was a pre-final stage. Due to its length the Customer began to stress out as he had already agreed on the departure date from his rented flat. For clarity, look at the state of the flat one week before turn-over.
Additionally, the density of works is considerably higher at the final stages and the probability things will go off plan escalates quickly. Although on the outset renovation progresses smoothly, when it comes to finish work and component installation, things tend to take time. We managed to complete renovation without emergencies at this project. We managed on time, our suppliers did a great job (except the shower enclosure case), and yet we highly recommend to have a little time in store at this stage.
"Don't worry, this stage is long, and that's how it should be if you want quality work. We always meet the deadline."
- on the experience of Kirill, Buildburo's Chief taskmaster
Final results
The apartment surely looks unfinished without built-in furniture and doors. The Customer ordered them separately and there was a small delay in delivery which didn't let us install plinths at time planned. The photos were taken during the final clean-up, literally minutes before signing Certificate of acceptance.
P.S. Wall areas without finish will be concealed by built-in furniture – another example of reasonable economy.
What we had in the end:
P.S. Wall areas without finish will be concealed by built-in furniture – another example of reasonable economy.
What we had in the end:
The project was turned over to the Customer two weeks ahead of schedule:
Planned deadline
13.04.2020
Actual date
27.03.2020
The apartment is currently under warranty till 27.09.2021
Hopefully we have provided sufficient information for you in case you decided to renovate on your own. And if you are searching for a company to organise all processes of your apartment renovation, we would suggest starting with the estimate.
Hopefully we have provided sufficient information for you in case you decided to renovate on your own. And if you are searching for a company to organise all processes of your apartment renovation, we would suggest starting with the estimate.
Do you know how much your flat renovation will cost you?
You give us your contacts and we give you a detailed estimate. In 3 days.

Free calculation of the cost of repair
-
-
To leave a request, just leave your contacts below and we will contact you shortly
-
-
Read also:
How we did a contemporary renovation of a rental apartment and how much it cost
A "withered" one-bed turned into a stylish and comfy dwelling. We used light-grey paint, floor-to-ceiling wardrobes and JYSK furniture.
Renovation as seen by the customer. one-bedroom apartment in Galaktika Residential Complex
What renovation looks like as seen by the customer. An interaction scheme, control mechanisms, and the cost.
Kyiv city, Victory V Residential Complex, Pobedy Avenue, 5В
Kyiv city, Victory V Residential Complex, Pobedy Avenue, 5В

EN
Our address
Kyiv, Popudrenko Street, 1A, The Space Coworking


Kyiv, Kyrylivska Street, 15a / 1, TCEH Podol
Contacts for suppliers
If you are a supplier, please contact only the contact details above
Contacts for clients
© bburo.org 2021. Any use or copying of materials or collection of site materials, design elements and design is allowed only with the permission of the copyright holder and only with reference to the source : https://bburo.org
Work days
Mn - St :
10 am - 7 pm
Sunday:
Closed
ВС: